

I have a customer that is needing to replace a WiFi module in his P2V+ so I thought I would do a step by step with photos for future reference.
Tools needed:
2mm allen wrench
#0 Phillips screw driver
Hair dryer
Work mat
Replacement WiFi Module Link for purchase
UPDATE As more Phantom 2 Vision+'s are reaching customers something that has happened is that the video feed will be lost. If you still have telemetry info like altitude, distance, speed, battery voltage, etc. and if you are still able to take video and pictures but are missing the video feed there is a high chance that you need to replace your WiFi module. Fortunately this is very easy.
Start by removing the top shell of your Phantom by removing the three allen screws on each arm and the one small phillips head screw. It is best to have a work mat so that screws do not go bouncing away. Note that you can have a screw sucked into the motor from the magnets so use caution!

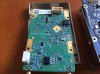
Unplug the GPS receiver wire from the main circuit board

Here is the WiFi module

Disconnect the two plugs on the side by pinching down on the clip and then a slight pull. Remove the single phillips head screw on the side of the module. Take note of the capacitor directly behind the module, this is important to watch for later

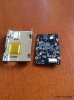
Plugs and screw removed

Carefully lift the WiFi module from the back to front. It is simply 2 sided taped onto the board. This is where heating it slightly with a hair dryer will help reduce the adhesion from the tape. Be careful to NOT damage the capacitor previously noted Remove the last ribbon cable from the rear of the module
Removed and shot of the tape

There are two antennas that are press-fit coaxial type. These will need a firm tug to release:

One of the antennas (just for reference)

All removed!

Hope you enjoyed this. If you have any more requests for other "How-To's" let me know and I will see what I can do.
Tools needed:
2mm allen wrench
#0 Phillips screw driver
Hair dryer
Work mat
Replacement WiFi Module Link for purchase
UPDATE As more Phantom 2 Vision+'s are reaching customers something that has happened is that the video feed will be lost. If you still have telemetry info like altitude, distance, speed, battery voltage, etc. and if you are still able to take video and pictures but are missing the video feed there is a high chance that you need to replace your WiFi module. Fortunately this is very easy.
Start by removing the top shell of your Phantom by removing the three allen screws on each arm and the one small phillips head screw. It is best to have a work mat so that screws do not go bouncing away. Note that you can have a screw sucked into the motor from the magnets so use caution!
Unplug the GPS receiver wire from the main circuit board
Here is the WiFi module
Disconnect the two plugs on the side by pinching down on the clip and then a slight pull. Remove the single phillips head screw on the side of the module. Take note of the capacitor directly behind the module, this is important to watch for later
Plugs and screw removed
Carefully lift the WiFi module from the back to front. It is simply 2 sided taped onto the board. This is where heating it slightly with a hair dryer will help reduce the adhesion from the tape. Be careful to NOT damage the capacitor previously noted Remove the last ribbon cable from the rear of the module
Removed and shot of the tape
There are two antennas that are press-fit coaxial type. These will need a firm tug to release:
One of the antennas (just for reference)
All removed!
Hope you enjoyed this. If you have any more requests for other "How-To's" let me know and I will see what I can do.


") i had the same problem with my pv+ no video feed whatsoever but telemetry. Tried evrything (other phone,reset of softwear etc etc..) but nothing worked. Buyed a new wifi module from helipal and replaced it. And now it works
i had the same problem with my pv+ no video feed whatsoever but telemetry. Tried evrything (other phone,reset of softwear etc etc..) but nothing worked. Buyed a new wifi module from helipal and replaced it. And now it works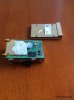
") )
)


