

You are using an out of date browser. It may not display this or other websites correctly.
You should upgrade or use an alternative browser.
You should upgrade or use an alternative browser.
HOW TO: Removing/Replacing your WiFi Module
- Thread starter DDMSteve
- Start date
4wd said:I've just fixed my black screen of death by doing this - thanks for good info.
Trickiest part - levering the old one out.
The sticky pad holds it very firmly and it is jammed against the Naza and that capacitor, and plenty of cables close to it you do not want to accidentally gouge with a tool.
Rebinding: don't forget to tap the blue tick to confirm
Was having a mild panic when that did not work first time!
Great additions! The double stick tape is really stuck on there. That is why I suggest use of a hair dryer (not too hot) to help loosen up the adhesive backing. It will come off much easier and will give you less chance of ripping off something else important.
Yes I did try that and it helped, but as you say it can get hotter than you'd think held very close so caution needed!
- Joined
- May 10, 2014
- Messages
- 3,012
- Reaction score
- 522
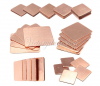
I wonder if a bit of copper heat sink stuck to the lid would help in reducing the heat inside. ?
Found these on ebay 20mm x 20 mm and available in different thicknesses upto 1mm
or 2nd picture which is slightly smaller at 12mm x 13 mm with adhesive pad on underside
Found these on ebay 20mm x 20 mm and available in different thicknesses upto 1mm
or 2nd picture which is slightly smaller at 12mm x 13 mm with adhesive pad on underside
Attachments
Has anyone figured out, which wires provide video signal and which provide telemetry and power? I can't seem to find documentation on the connectors anywhere.
- Joined
- Dec 29, 2013
- Messages
- 182
- Reaction score
- 0
First picture = Not likely. . .robinb said:I wonder if a bit of copper heat sink stuck to the lid would help in reducing the heat inside. ?
Second picture = Probably. . .
A better suggestion however, would be a heat sink made from Aluminum. Generally speaking, Aluminum is approximately 40% lighter than copper and conducts heat approximately 80% as well as copper. :mrgreen:
Of major importance with regard to heat sink efficiency is the preparation of the bonding/mating surfaces. Make sure both surfaces are as smooth as you can get them before you join them together with a high quality heat-sink compound. Use the heat sink compound sparingly (less is more). If possible, keep constant bonding pressure on the two surfaces for at least the first ten heat up / cool down cycles, as this will improve molecular adhesion between the two dissimilar surfaces.
- Joined
- May 10, 2014
- Messages
- 3,012
- Reaction score
- 522

- Joined
- Jul 12, 2014
- Messages
- 24
- Reaction score
- 1
Thanks for this post. Changing the WiFi module got my FPV back!!
I lost the FPV after 6 weeks but still had all telemetry.
Replaced the WiFi module and the FPV is back!!
I also only have the one wire coming out the side of the WiFi booster.
Does anyone think this is significant to the performance or to the ultimate failure of the WiFi module??
I lost the FPV after 6 weeks but still had all telemetry.
Replaced the WiFi module and the FPV is back!!
I also only have the one wire coming out the side of the WiFi booster.
Does anyone think this is significant to the performance or to the ultimate failure of the WiFi module??
I suspect they just used stock cables and connectors which happen to have three wires, and only the one is in use.
Looks like it's the newer ones have only one wire?
It must work OK for the most part.
Looks like it's the newer ones have only one wire?
It must work OK for the most part.
I saw this thread the other day and immediately ordered the wifi module from DDM. I replaced it (no hair dryer needed) and it solved all my video transmission issues. If anybody is having issues, I suggest trying to replace the module. It is VERY easy! Just a huge FYI, my issues of video loss got progressively worse over time, without a crash, so it would be very easy to assume it is a software (app) issue. Not sure what the root cause of the bad module was, but mine is working like a champ.
Thanks to DDMSteve for this tutorial, I'm not sure I would have replaced the module if not for knowing how to do it!
Thanks to DDMSteve for this tutorial, I'm not sure I would have replaced the module if not for knowing how to do it!
- Joined
- Jun 8, 2014
- Messages
- 15
- Reaction score
- 0
I'm attempting the same repair, thanks to DDM. Unfortunately, two of the Phillips head screws are refusing to come out.
It's never easy.
Update: One hold out! I'm going back in!
Must be Loctited in. I used the right size driver, but it appears to be stripped out and still stuck in place.
3rd Edit...stripped that sucker bare. Had to have a buddy bust out the Dremel to cut a notch into the screw. Finally got it out.
Replaced the part, now powering up to see what I screwed up.
It is crucial to have the correct one - 00 I think it is.
You also need a fairly chunky handle to apply enough force.
this set is ideal and includes suitable hex drive.
The shaft of the tool is long enough to undo the tricky ones against the leg easily too.
http://www.amazon.co.uk/gp/product/B000NI1D8M
You also need a fairly chunky handle to apply enough force.
this set is ideal and includes suitable hex drive.
The shaft of the tool is long enough to undo the tricky ones against the leg easily too.
http://www.amazon.co.uk/gp/product/B000NI1D8M
Wait, so people are really spending nearly $200 to replace a part, which appears to be failing in large numbers, on an item that most have had for just a few months? I haven't frequented the boards lately, but how is DJI not taking responsibility for these wifi module failures?
- Joined
- Jun 8, 2014
- Messages
- 15
- Reaction score
- 0
Part swapped out...lost GPS and camera. I am a failure as a Phantom mechanic. The Whole Smash gets shipped to DDM.
Well, I wasn't getting any video or camera feed at all. Some report they could still take photos and video, but had no fpv. I had also replaced the main board in the gimbal after a crash. It was working after the crash, but the arm had bent. I stupidly knocked off a transistor while straightening the arm out. That board ran me 325 on E-bay. Funny thing is I still had video on the original gimbal. Anyway, I purchased the WiFi module and replaced mine in the hopes that it would straighten out the video issue. No go. So now I've spent a total of $505.00 on a product I don't feel was designed very well. I realize that stripping the transistor off was my own stupidity, but the original problem was that the phantom lost all connectivity and drifted into a tree to begin with. I'm now thinking the camera may be at fault even though I can move it up and down, left to right. I still get no video whatsoever. Anyone got any ideas ? I'm thinking it is now E-bay fodder and am dangerously close to saying bye bye.
shawnb199 said:Wait, so people are really spending nearly $200 to replace a part, which appears to be failing in large numbers, on an item that most have had for just a few months? I haven't frequented the boards lately, but how is DJI not taking responsibility for these wifi module failures?
At best they'd want you to send it for repair; it would be away for several weeks and the shipping cost would be significant - as would risk of damage in transit.
It's a relatively easy repair and sometimes it just feels best to fix things yourself.
hi I have vision but telemetry info like altitude, distance, speed, battery voltage, are missing still able to take video and pictures any suggestions have replaced cables ,even new wifi unit but still the sameDDMSteve said:I have a customer that is needing to replace a WiFi module in his P2V+ so I thought I would do a step by step with photos for future reference.
Tools needed:
2mm allen wrench
#0 Phillips screw driver
Hair dryer
Work mat
Replacement WiFi Module Link for purchase
UPDATE As more Phantom 2 Vision+'s are reaching customers something that has happened is that the video feed will be lost. If you still have telemetry info like altitude, distance, speed, battery voltage, etc. and if you are still able to take video and pictures but are missing the video feed there is a high chance that you need to replace your WiFi module. Fortunately this is very easy.
Start by removing the top shell of your Phantom by removing the three allen screws on each arm and the one small phillips head screw. It is best to have a work mat so that screws do not go bouncing away. Note that you can have a screw sucked into the motor from the magnets so use caution!

Unplug the GPS receiver wire from the main circuit board

Here is the WiFi module

Disconnect the two plugs on the side by pinching down on the clip and then a slight pull. Remove the single phillips head screw on the side of the module. Take note of the capacitor directly behind the module, this is important to watch for later

Plugs and screw removed

Carefully lift the WiFi module from the back to front. It is simply 2 sided taped onto the board. This is where heating it slightly with a hair dryer will help reduce the adhesion from the tape. Be careful to NOT damage the capacitor previously noted Remove the last ribbon cable from the rear of the module
Removed and shot of the tape

There are two antennas that are press-fit coaxial type. These will need a firm tug to release:

One of the antennas (just for reference)

Hope you enjoyed this. If you have any more requests for other "How-To's" let me know and I will see what I can do.
Just wanted to add my experience here. Had the same problem--after about ten flights I lost live video. Could still control the camera but no images. Bought the new module and replaced it as described here, and the live video is fixed. Thanks for the information! Only correction (not the first one to say it) is that you need a #00 phillips screwdriver or you will strip the threads.
Hi All,
After swapping out the ribbon cable in an attempt to get back any video at all (much worse than swapping out WiFi module) I purchased a WiFi module from 1uas. I replaced it and had everything going in about an hour. Still spinning video on my iPad. Phone just shows a blank screen. I have full telemetry and SATs, etc. I noticed a difference in some of the screenshots on the post. My replacement module looked just like the one I had originally. The surface is totally smooth. I also noticed the "new" module had 3 tiny indentations which I did not do. It is possible it happened in transit as the module was placed near the top of the box with padding all around it. Just not sure on that one. However, I noticed in screenshots of replacement modules there is an indented diamond on a lot of them or all of them. Is there a different manufacturer or a different/later batch ? I ordered another one from Helipal as that seems to be the one most people are purchasing. Hopefully it will be in while I have time to play with it. Just an observation....
After swapping out the ribbon cable in an attempt to get back any video at all (much worse than swapping out WiFi module) I purchased a WiFi module from 1uas. I replaced it and had everything going in about an hour. Still spinning video on my iPad. Phone just shows a blank screen. I have full telemetry and SATs, etc. I noticed a difference in some of the screenshots on the post. My replacement module looked just like the one I had originally. The surface is totally smooth. I also noticed the "new" module had 3 tiny indentations which I did not do. It is possible it happened in transit as the module was placed near the top of the box with padding all around it. Just not sure on that one. However, I noticed in screenshots of replacement modules there is an indented diamond on a lot of them or all of them. Is there a different manufacturer or a different/later batch ? I ordered another one from Helipal as that seems to be the one most people are purchasing. Hopefully it will be in while I have time to play with it. Just an observation....
Similar threads
- Replies
- 0
- Views
- 1K
- Replies
- 5
- Views
- 758
- Replies
- 8
- Views
- 4K
- Replies
- 2
- Views
- 3K


