- Joined
- Jan 17, 2014
- Messages
- 54
- Reaction score
- 1
Apologies if this has been posted here... I just saw a reference to this procedure on FaceBook and it actually worked.
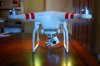
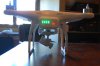
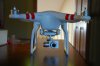
About a month ago, I had a crash that bent my gimbal arm. I straightened it as much as I felt comfortable - fearing I would break the thing. I was left with the dreaded tilted camera.
I was hoping for some kind of electronic horizontal calibration that would allow me to tell the gimbal where horizontal was. There's no way to do it through the Assistant.
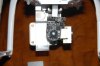
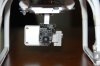
The camera is attached to the gimbal motor shaft purely (I guess) by friction. Removing the back cover of the horizontal gimbal motor reveals this small circuit board.
The little "D" shaped object right in the middle of the circuit board is the motor shaft.
1. Put the camera/gimbal clamp on.
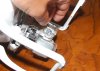
2. Carefully lift the little circuit board. It's attached to the ribbon cable so be careful.
3. I used a pair of needle nose pliers to twist the shift in the opposite direction of my tilt.
A little trial and error seems to have gotten me VERY close to level again!
You can see that my gimbal arm still isn't perfectly vertical but the camera and gimbal now seem to be level to the ground. I haven't flown it yet so time will tell if I've just loosened things up to the point where the camera will just eventually fall off.
I ordered a replacement camera/gimbal exactly one day before I saw this solution (bummer)! I have that replacement in hand and now I need to figure out if I keep it for a spare or return it")
Your mileage may vary...
--
Tom L.
About a month ago, I had a crash that bent my gimbal arm. I straightened it as much as I felt comfortable - fearing I would break the thing. I was left with the dreaded tilted camera.
I was hoping for some kind of electronic horizontal calibration that would allow me to tell the gimbal where horizontal was. There's no way to do it through the Assistant.
The camera is attached to the gimbal motor shaft purely (I guess) by friction. Removing the back cover of the horizontal gimbal motor reveals this small circuit board.
The little "D" shaped object right in the middle of the circuit board is the motor shaft.
1. Put the camera/gimbal clamp on.
2. Carefully lift the little circuit board. It's attached to the ribbon cable so be careful.
3. I used a pair of needle nose pliers to twist the shift in the opposite direction of my tilt.
A little trial and error seems to have gotten me VERY close to level again!
You can see that my gimbal arm still isn't perfectly vertical but the camera and gimbal now seem to be level to the ground. I haven't flown it yet so time will tell if I've just loosened things up to the point where the camera will just eventually fall off.
I ordered a replacement camera/gimbal exactly one day before I saw this solution (bummer)! I have that replacement in hand and now I need to figure out if I keep it for a spare or return it
Your mileage may vary...
--
Tom L.