

- Joined
- Oct 30, 2014
- Messages
- 32,156
- Reaction score
- 10,917
- Location
- Harrisburg, PA (US)
- Website
- phantomhelp.com
Follow the steps below to setup and use the Waypoints feature in the DJI GO app. If you have additional tips or information below, please comment below.
Note: In order to create a waypoint mission, you must actually fly to each waypoint and manually mark those locations. Your Phantom will then be able to recall that mission and automatically fly it. The steps below will guide you through this process.
------------------------------------------------------------------------------------------------------------
Launch the Waypoints feature.
------------------------------------------------------------------------------------------------------------
1) Your Phantom needs to be started and in the air before you'll be able to access the Waypoints feature in the DJI GO app. Start your Phantom, take off, and hover at the location you'd like to set as the first waypoint in your mission.
2) Flip the PAF switch to the "F" position to access the IOC features. If Multiple Flight Mode is not enabled, you're going to see the following prompt:

If you see the above prompt, click the "OK" button to enable Multiple Flight Mode.
3) Select "Waypoints" from the IOC menu.
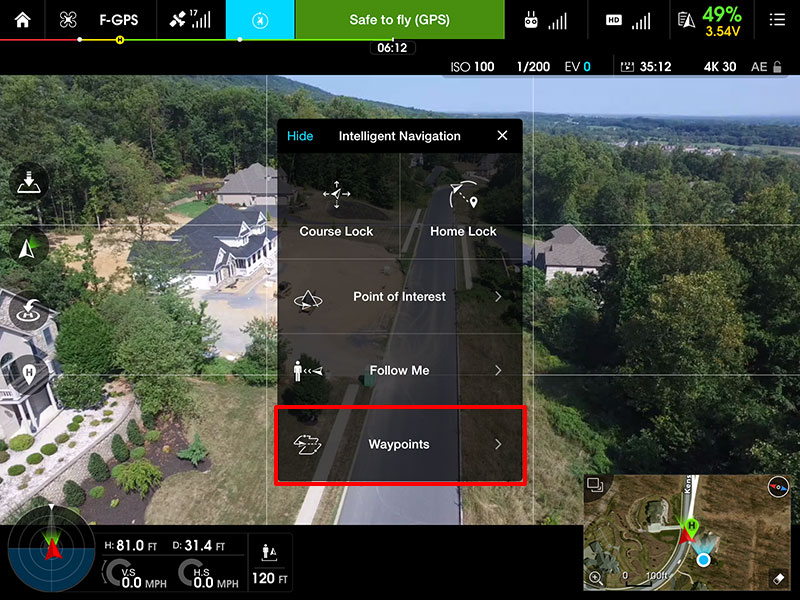
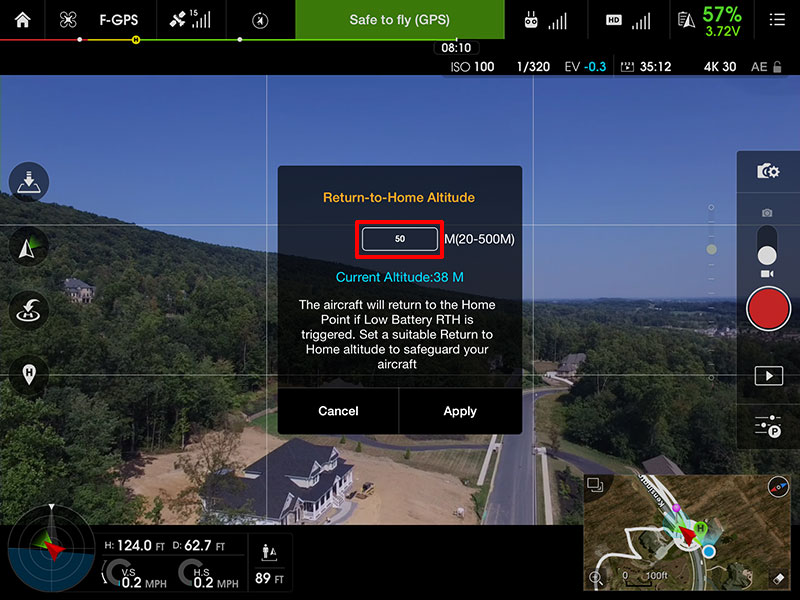
4) You might be prompted to verify your RTH Altitude setting. If so, ensure the altitude is set higher than all obstacles in your location. This will ensure that you do not accidentally crash into an obstacle if RTH initiates and your Phantom tries to return to the home point.
------------------------------------------------------------------------------------------------------------
Mark the waypoints on the map.
------------------------------------------------------------------------------------------------------------
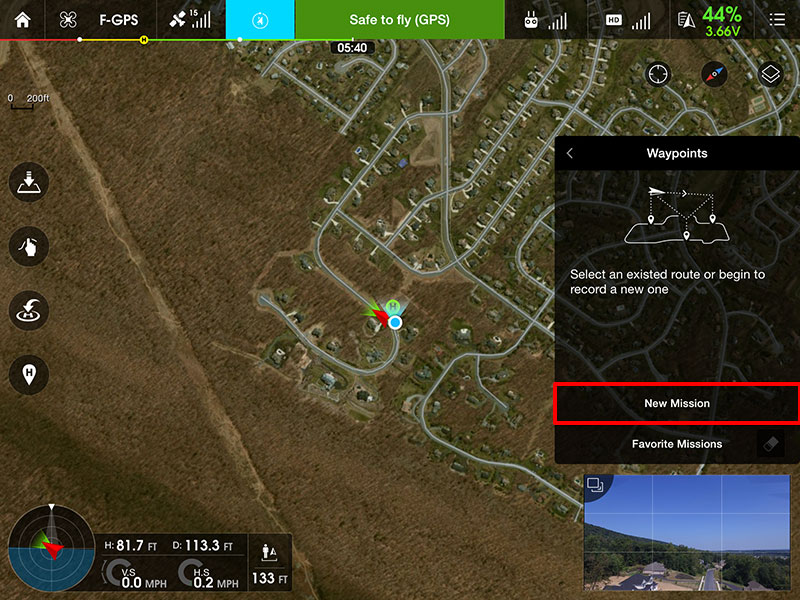
Note: Skip to step #20 below if you want to load a previously flown waypoint mission.
5) Click the "New Mission" button to create a new waypoint mission.
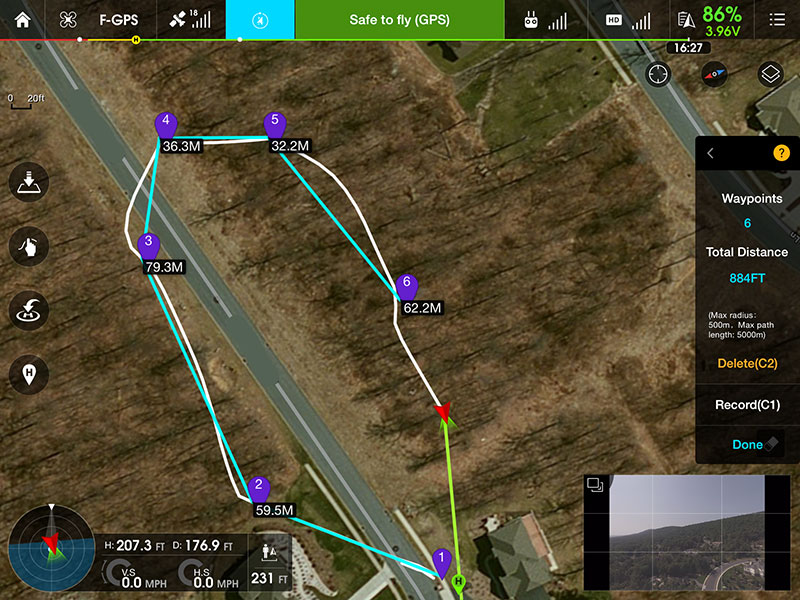
6) A new menu will appear on the right side of the DJI GO app. Use this menu to mark the waypoints on the map.
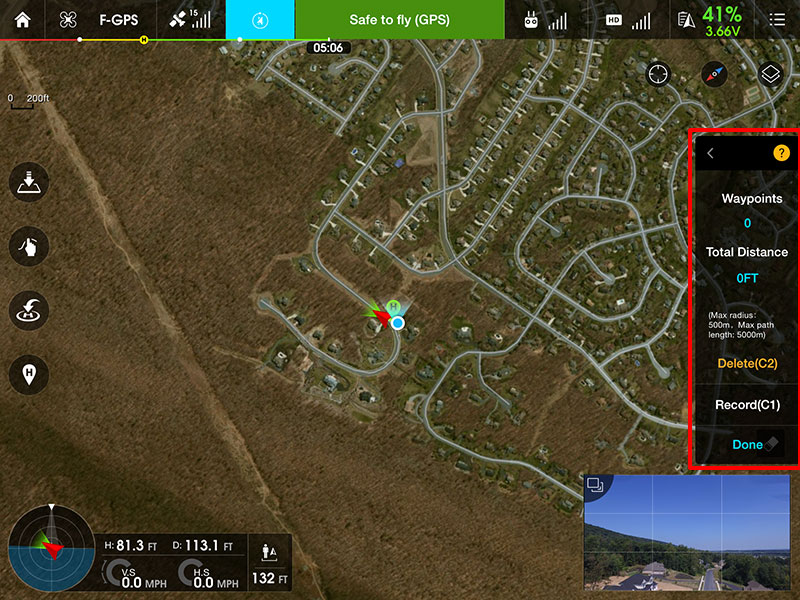
The "Waypoints" count will show the number of waypoints on the map. It'll start at 0 and count up each time you fly your Phantom to a new location and add a new waypoint.

The "Total Distance" shows you the total distance your Phantom will travel as it flies to all of the waypoints in your mission.
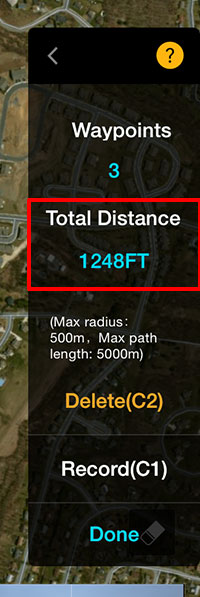
7) Fly to each location where you'd like to add a new waypoint to the map and click the "Record" button. You can also press the C1 button on your remote controller to mark a new waypoint.
Note: Waypoints store the location, altitude, and direction the Phantom is facing. Make sure you descend or ascend to the desired altitude before marking each waypoint. Each waypoint can be set to a different altitude.

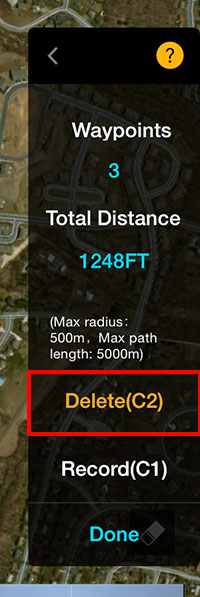
Click the "Delete" button to remove the last added waypoint from the map. You can also press the C2 button on your remote controller to remove the waypoint.
8) Click the "Done" button when you're done adding waypoints. Your mission should look something like this:
------------------------------------------------------------------------------------------------------------
Configure the Waypoint settings.
------------------------------------------------------------------------------------------------------------
9) A new menu will appear showing you settings to configure the heading, speed, and action to perform when the mission has completed.
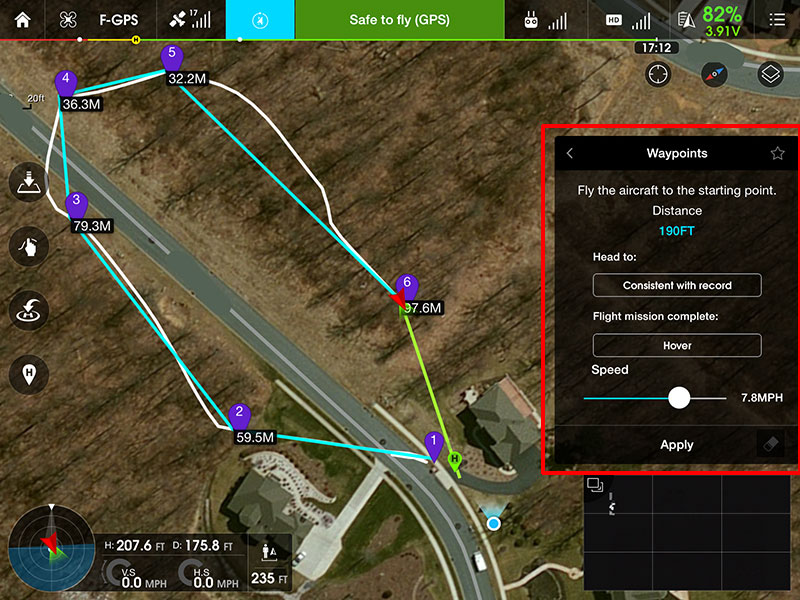
10) In the "Head to" selection, choose the direction your Phantom should point as it travels to each waypoint. You have the following choices:
Consistent with Record: Point your Phantom in the direction it was facing when you recorded the waypoint.
Consistent with Route: Point your Phantom toward the waypoint it's flying to.
Free: Allows you to yaw and turn your Phantom in any direction as it travels to each waypoint.

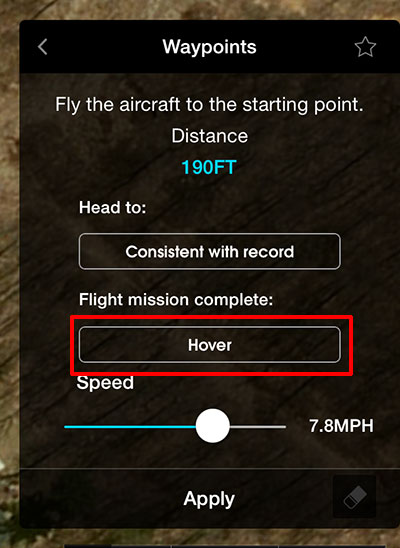
11) Choose what should happen when your Phantom completes the mission. You have the following choices:
Hover: Your Phantom will hover at the location of the last waypoint.
Return to Home: Your Phantom will return to the home point.
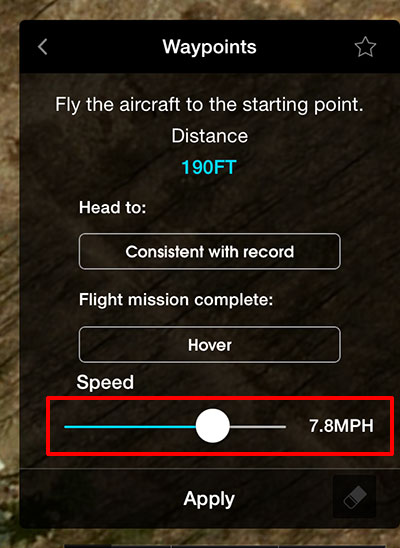
12) Set the speed at which your Phantom should fly as it travels from waypoint to waypoint.
13) Click the "Apply" button to save your settings, send the mission details to your Phantom, and start the mission.
Important: Your Phantom will automatically fly to the location and altitude of the first waypoint before starting the mission. So, make sure there are no obstacles between its current location and the first waypoint.
------------------------------------------------------------------------------------------------------------
Make adjustments as your Phantom flies its mission
------------------------------------------------------------------------------------------------------------
14) A new menu will appear on the right side of the DJI GO app to allow you to control your Phantom as it travels on its mission.

15) Click the "Pause" button to make your Phantom stop at its current location and wait for further direction from you. Unpause to continue on with the mission.

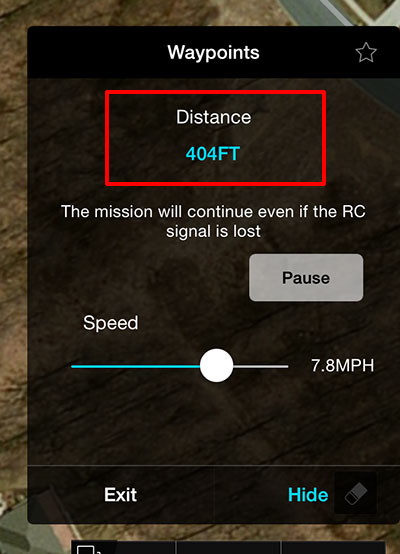
16) The "Distance" value shows how far away your Phantom is from the home point. The is the distance in a straight line between the Phantom's current location and the home point.
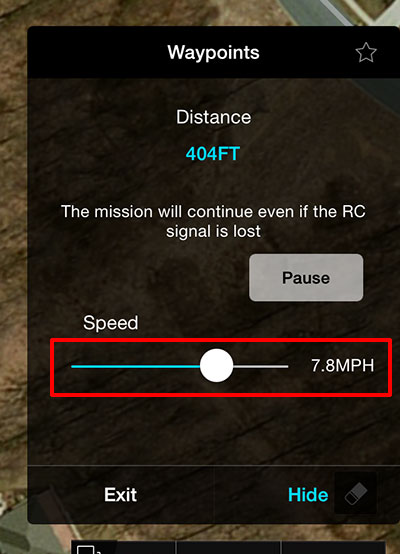
17) As your Phantom is traveling the mission, you can adjust the speed slider to increase/decrease the speed. The speed value with change in real-time as you make this adjustment. Your Phantom will also start traveling at the new speed as you increase/decrease it.
18) Click the "Exit" button to stop the mission and exit the Waypoint function. You can also exit by flipping the PAF switch back to the "P" position.
------------------------------------------------------------------------------------------------------------
Fly the same waypoint mission again.
------------------------------------------------------------------------------------------------------------
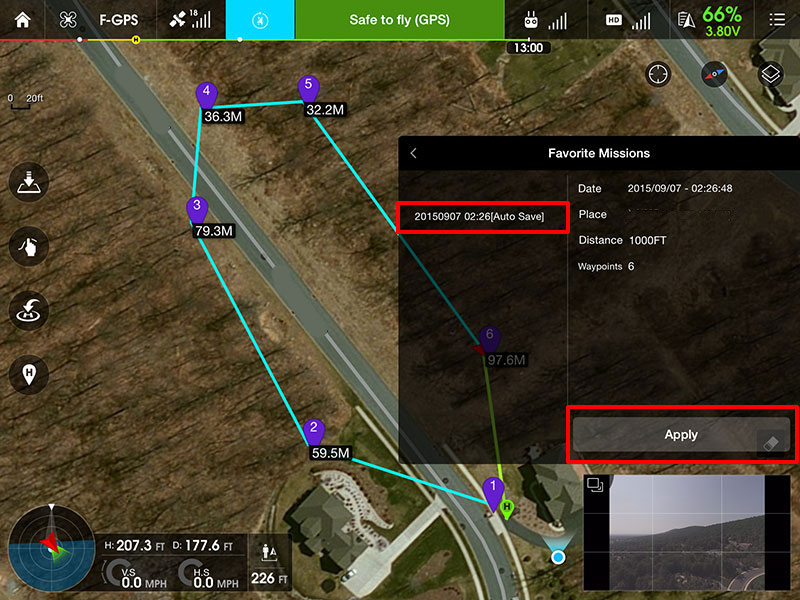
19) After creating a waypoint mission, you can fly the same mission again by clicking the "Favorite Missions" button.

20) Select the mission you'd like to fly from the menu on the left and click the "Apply" button.
Note: In order to create a waypoint mission, you must actually fly to each waypoint and manually mark those locations. Your Phantom will then be able to recall that mission and automatically fly it. The steps below will guide you through this process.
------------------------------------------------------------------------------------------------------------
Launch the Waypoints feature.
------------------------------------------------------------------------------------------------------------
1) Your Phantom needs to be started and in the air before you'll be able to access the Waypoints feature in the DJI GO app. Start your Phantom, take off, and hover at the location you'd like to set as the first waypoint in your mission.
2) Flip the PAF switch to the "F" position to access the IOC features. If Multiple Flight Mode is not enabled, you're going to see the following prompt:
If you see the above prompt, click the "OK" button to enable Multiple Flight Mode.
3) Select "Waypoints" from the IOC menu.
4) You might be prompted to verify your RTH Altitude setting. If so, ensure the altitude is set higher than all obstacles in your location. This will ensure that you do not accidentally crash into an obstacle if RTH initiates and your Phantom tries to return to the home point.
------------------------------------------------------------------------------------------------------------
Mark the waypoints on the map.
------------------------------------------------------------------------------------------------------------
Note: Skip to step #20 below if you want to load a previously flown waypoint mission.
5) Click the "New Mission" button to create a new waypoint mission.
6) A new menu will appear on the right side of the DJI GO app. Use this menu to mark the waypoints on the map.
The "Waypoints" count will show the number of waypoints on the map. It'll start at 0 and count up each time you fly your Phantom to a new location and add a new waypoint.
The "Total Distance" shows you the total distance your Phantom will travel as it flies to all of the waypoints in your mission.
7) Fly to each location where you'd like to add a new waypoint to the map and click the "Record" button. You can also press the C1 button on your remote controller to mark a new waypoint.
Note: Waypoints store the location, altitude, and direction the Phantom is facing. Make sure you descend or ascend to the desired altitude before marking each waypoint. Each waypoint can be set to a different altitude.
Click the "Delete" button to remove the last added waypoint from the map. You can also press the C2 button on your remote controller to remove the waypoint.
8) Click the "Done" button when you're done adding waypoints. Your mission should look something like this:
------------------------------------------------------------------------------------------------------------
Configure the Waypoint settings.
------------------------------------------------------------------------------------------------------------
9) A new menu will appear showing you settings to configure the heading, speed, and action to perform when the mission has completed.
10) In the "Head to" selection, choose the direction your Phantom should point as it travels to each waypoint. You have the following choices:
Consistent with Record: Point your Phantom in the direction it was facing when you recorded the waypoint.
Consistent with Route: Point your Phantom toward the waypoint it's flying to.
Free: Allows you to yaw and turn your Phantom in any direction as it travels to each waypoint.
11) Choose what should happen when your Phantom completes the mission. You have the following choices:
Hover: Your Phantom will hover at the location of the last waypoint.
Return to Home: Your Phantom will return to the home point.
12) Set the speed at which your Phantom should fly as it travels from waypoint to waypoint.
13) Click the "Apply" button to save your settings, send the mission details to your Phantom, and start the mission.
Important: Your Phantom will automatically fly to the location and altitude of the first waypoint before starting the mission. So, make sure there are no obstacles between its current location and the first waypoint.
------------------------------------------------------------------------------------------------------------
Make adjustments as your Phantom flies its mission
------------------------------------------------------------------------------------------------------------
14) A new menu will appear on the right side of the DJI GO app to allow you to control your Phantom as it travels on its mission.
15) Click the "Pause" button to make your Phantom stop at its current location and wait for further direction from you. Unpause to continue on with the mission.
16) The "Distance" value shows how far away your Phantom is from the home point. The is the distance in a straight line between the Phantom's current location and the home point.
17) As your Phantom is traveling the mission, you can adjust the speed slider to increase/decrease the speed. The speed value with change in real-time as you make this adjustment. Your Phantom will also start traveling at the new speed as you increase/decrease it.
18) Click the "Exit" button to stop the mission and exit the Waypoint function. You can also exit by flipping the PAF switch back to the "P" position.
------------------------------------------------------------------------------------------------------------
Fly the same waypoint mission again.
------------------------------------------------------------------------------------------------------------
19) After creating a waypoint mission, you can fly the same mission again by clicking the "Favorite Missions" button.
20) Select the mission you'd like to fly from the menu on the left and click the "Apply" button.
Last edited:


