You might be the best pilot in the world but your films are going to suck if you don’t edit them.
Bad films are ten a penny and most will not even look at them let alone comment. It needn’t be this way though if you follow some simple steps.
The casual user might want to observe just a few of the following tips and the more dedicated film maker will want to follow even more, and of course contribute their own tips to the community.
All of what I say I have learnt from others over the years and from my own trial and error.
Learn from others
The first rule is to learn from watching other peoples films. Start critiquing them either to yourself or on the forum. Consider what you like and what would you would do better. I am talking here of how it was filmed, not what was filmed. Make a list of the type of shots you love to see and try to include them in your own work.
Put some effort in
An impromptu flight might catch something amazing but mostly its just wobbly boredom to others. So don’t rely on luck, rely on planning.
Decide your target audience
Is the film just for you and your family or are you hoping to impress the community? Your family will accept most things but the community want something much more considered. This does not mean you can’t publish your first flight but do at least try and include shots or yourself and whoever is with you in them. We all like to see the expression on your face as you take off for the first time")
Do keep it short
Try to keep your film under 3 minutes in length. People are highly likely to stop watching it after then so why bother making it any longer? Family and friends can take a little bit longer but not much and its not nice to torture them
Choose a worthwhile subject.
Your back yard might not be the most interesting location to the masses. What about making a film of your community including several local landmarks and beauty spots. The potential subject list is endless. A key requirement though is that the subjects interest you otherwise you won’t have any passion for it. Keep it simple and then more daring as your experience grows.
Change the shot often
A good video generally needs movement and variety. This needs lots of different shots, many more than you might imagine. As a rule of thumb shots should change every 2-4 seconds.
Something needs to be moving within the frame, either the Phantom or a subject. Static hovers rarely work. The movement can be fast or incredibly slow. You can’t zoom your Gopro or Vision but you can fly closer.
Remember that just aerial shots can become boring very quickly so mix it up. If you can, use another camera to film interesting things from ground level. Get close to things so they fill the frame as well as mid and long shots. Film people, dogs, wildlife, boats whatever you see. These are your ‘cutaways’ and you use them to link your main shots together and to avoid monotomy.
Pick your locations
Now you have made a list of sites you want to include spend some time investigating them to maximise your chances of capturing interesting shots. If your very committed then consider a non filming site visit, possibly take some ground level photos for detailed planning back at base. If you can’t visit then see if others have posted photos on the web.
Google Maps can help to identify interesting land marks, hidden dangers, where you might park and the route to your location.
Consider the sun
There are some excellent apps that allow you to see where the sun will be at any time of the day. I use an iPhone app called TPE. http://www.suncalc.net is an excellent free resource on the web that does the same. Know in advance when your main subject will be bathed in sunlight or perhaps in silhouette. This is vital info for maximising that special light during the 'golden hour' when the sun rises or sets.
Consider timing
Be aware of the best time to visit your chosen locations. You can avoid a wasted trip should it be so busy that you can’t park or have to fend off people interested in your Phantom. This element requires patience and can take days for the weather, the sun, and the time of the week to come together. There is no rush and you may have to grab film over several days.
Decide if your Phantom will appear in your film
This is a personal preference but it deserves some thought. If you don’t want to give the game away then ensure your not in the picture and neither is the Phantoms reflections or shadow. On the other hand if the Phantom is to appear then exploit reflections and shadows to maximum effect. Also take a camcorder to take some shots of the Phantom in flight. These are ideal for linking different aerial shots together. For example you might have a shot of the Phantom flying past a subject and climbing whilst turning right. This can be followed by cutting to the forward looking banked aerial shot.
Don’t forget the sound and music
The Phantom Vision camera has no audio capture. The Gopro does and both have disadvantages. Not many people want to listen to roaring wind noise and whining motors so the Gopro sound is generally unusable after take off. Why not record the ambient sound of the site on a separate camera or your gopro and use just the audio to overlay the flight video.
This can be mixed with an appropriate music track to create the effect your looking for. Consider what your trying to achieve when picking the music. Do you want emotion, a sense of fun or danger perhaps. Check to see if others are using the track on Youtube. If they are then its much less likely your video will be muted due to copyright.
Most songs or instrumental tracks have a chorus. The chorus is likely to be where your ‘money shots’ should be used. (A money shot is anything that makes you say Wow. I don’t think I need to go further with where this came from) There will probably be 3 or 4 of these in a track so you need at least 3 or 4 money shots! You also need enough good footage to fill the rest of the track.
Play the music several times and identify where you will cut and change to a different shot. Some video editors can analyse the track and place markers on the beats making it easy for you to cut on the beat. I use Final Cut Pro X and that allows me to tap the keyboard to place markers on the audio track where I want to change shots. Cutting to the beat properly can lift a video from being good to amazing. Don’t think you have to cut on every change in beat though otherwise it can become too predictable.
Storyboard your film
Based on your research your now in a position to mentally imagine how your film will look set to that music track. If you can’t imagine this then your not going to have much luck in the field getting the shots you want.
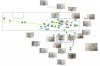
Draw very simple stick figure type pictures of each scene to help with the creation of a shot list for you to follow. It sounds a lot of work but its not, and its going to make your life so easy when filming and editing later. No drawing skills are necessary as nobody but you will see it. Either use this or make a simple list of shots you intend to shoot. This will be your guide on the day.
I use post-it notes like this. The little symbol represents my camera and what angle it will point. By the way there is no spell checker on a post-it note
The night before
Charge everything and confirm its working
Clear memory cards.
Take spare Tx batteries.
Take your Phone usb cable for charging in the car
Take your DJI Mini Usb cable for charging the range extender in the car
Possibly take an inverter and DJI charger for field charging your main batteries from 12v socket
Charge ground camcorders and audio recorders
Don’t forget your shot list.
If your flying a Phantom Vision then strap your Gopro to your head to record in flight footage of the Phantom automatically.
On Location
Get there in plenty of time.
Set up your Phantom and go through your checks
Get out your shot list and work through it ticking them off.
Get the ‘money shots’ asap.
Don’t waste battery power - plan the flight - place the Phantom in the sky - film - land.
Allow cutting room on shots, a little extra footage can be a life saver.
If your confident enough use ATTI mode for smoothness during flight.
Film slowly as it can always be speeded up during editing.
Don’t get sidetracked by passersby, your there to shoot the shot list not chat.
Film plenty of ground action cutaways
Film plenty of ground shots of the phantom in flight to act as links between aerial shots.
Record ambient sound of the site. Try to get one or more continuous takes a bit longer than the total length of your final video. This avoids having to loop the audio.
Finally by all means grab any spontaneous shots that appear on the day in addition to the shot list.
Editing your masterpiece
I find editing the video to be the most enjoyable part of the whole process. The most important point I can make is to take your time. There is no need to rush this. Often you will experience a desperate desire to post your video asap. DONT. Resist this newbie type error otherwise you will regret it.
Start by assembling your shots as per your story board but don’t be afraid to change the order if it looks better.
Add any titles and end credits at this point. This way you are able to take them into consideration when cutting to the music. Finalise the order of the clips before you focus on the sound. Then start to cut the shots to the music.
Review the film several times and make improvements. As you watch it there will be bits that your gut feeling tell you are not right. Don’t ignore them, get them fixed. Be ruthless with your material. Exclude anything that does not add to the story your telling. Provided you have shot plenty of clips you should be spoilt for choice not scraping the barrel.
Once you are 100% satisfied don’t post it. Leave it until the next day and review it again. Editing can be tiring and so taking some time away from your project brings fresh eyes and allows you to polish it. Finally you will look at it and say ‘I can do no more’. This is the time to upload it and craft a little piece explaining what the film is about and how you went about its production. By all means include a list of the equipment used, the editor etc as people will want to know.
There is nothing more satisfying
The Power Of Reverse
This video tip demonstrates how Quads experience turbulence when descending. Things are much smoother in the climb. A poster on this forum (apologies but I can't find who) mentioned that professional pilots often film a shot in the climb for smoothness and just reverse the clip if they need a descent. You can also fake a really smooth landing by filming the takeoff and reversing it.
[youtube]http://www.youtube.com/watch?v=1geozI4ZNhA[/youtube]
Good Examples From This Forum
'Touch The Sky ' by forum member Nrameckers - fantastic use of shadows, sunlight, different angles and the emotion of music.
[youtube]http://www.youtube.com/watch?v=2NCI2f4rOa0[/youtube]
Bad films are ten a penny and most will not even look at them let alone comment. It needn’t be this way though if you follow some simple steps.
The casual user might want to observe just a few of the following tips and the more dedicated film maker will want to follow even more, and of course contribute their own tips to the community.
All of what I say I have learnt from others over the years and from my own trial and error.
Learn from others
The first rule is to learn from watching other peoples films. Start critiquing them either to yourself or on the forum. Consider what you like and what would you would do better. I am talking here of how it was filmed, not what was filmed. Make a list of the type of shots you love to see and try to include them in your own work.
Put some effort in
An impromptu flight might catch something amazing but mostly its just wobbly boredom to others. So don’t rely on luck, rely on planning.
Decide your target audience
Is the film just for you and your family or are you hoping to impress the community? Your family will accept most things but the community want something much more considered. This does not mean you can’t publish your first flight but do at least try and include shots or yourself and whoever is with you in them. We all like to see the expression on your face as you take off for the first time
Do keep it short
Try to keep your film under 3 minutes in length. People are highly likely to stop watching it after then so why bother making it any longer? Family and friends can take a little bit longer but not much and its not nice to torture them
Choose a worthwhile subject.
Your back yard might not be the most interesting location to the masses. What about making a film of your community including several local landmarks and beauty spots. The potential subject list is endless. A key requirement though is that the subjects interest you otherwise you won’t have any passion for it. Keep it simple and then more daring as your experience grows.
Change the shot often
A good video generally needs movement and variety. This needs lots of different shots, many more than you might imagine. As a rule of thumb shots should change every 2-4 seconds.
Something needs to be moving within the frame, either the Phantom or a subject. Static hovers rarely work. The movement can be fast or incredibly slow. You can’t zoom your Gopro or Vision but you can fly closer.
Remember that just aerial shots can become boring very quickly so mix it up. If you can, use another camera to film interesting things from ground level. Get close to things so they fill the frame as well as mid and long shots. Film people, dogs, wildlife, boats whatever you see. These are your ‘cutaways’ and you use them to link your main shots together and to avoid monotomy.
Pick your locations
Now you have made a list of sites you want to include spend some time investigating them to maximise your chances of capturing interesting shots. If your very committed then consider a non filming site visit, possibly take some ground level photos for detailed planning back at base. If you can’t visit then see if others have posted photos on the web.
Google Maps can help to identify interesting land marks, hidden dangers, where you might park and the route to your location.
Consider the sun
There are some excellent apps that allow you to see where the sun will be at any time of the day. I use an iPhone app called TPE. http://www.suncalc.net is an excellent free resource on the web that does the same. Know in advance when your main subject will be bathed in sunlight or perhaps in silhouette. This is vital info for maximising that special light during the 'golden hour' when the sun rises or sets.
Consider timing
Be aware of the best time to visit your chosen locations. You can avoid a wasted trip should it be so busy that you can’t park or have to fend off people interested in your Phantom. This element requires patience and can take days for the weather, the sun, and the time of the week to come together. There is no rush and you may have to grab film over several days.
Decide if your Phantom will appear in your film
This is a personal preference but it deserves some thought. If you don’t want to give the game away then ensure your not in the picture and neither is the Phantoms reflections or shadow. On the other hand if the Phantom is to appear then exploit reflections and shadows to maximum effect. Also take a camcorder to take some shots of the Phantom in flight. These are ideal for linking different aerial shots together. For example you might have a shot of the Phantom flying past a subject and climbing whilst turning right. This can be followed by cutting to the forward looking banked aerial shot.
Don’t forget the sound and music
The Phantom Vision camera has no audio capture. The Gopro does and both have disadvantages. Not many people want to listen to roaring wind noise and whining motors so the Gopro sound is generally unusable after take off. Why not record the ambient sound of the site on a separate camera or your gopro and use just the audio to overlay the flight video.
This can be mixed with an appropriate music track to create the effect your looking for. Consider what your trying to achieve when picking the music. Do you want emotion, a sense of fun or danger perhaps. Check to see if others are using the track on Youtube. If they are then its much less likely your video will be muted due to copyright.
Most songs or instrumental tracks have a chorus. The chorus is likely to be where your ‘money shots’ should be used. (A money shot is anything that makes you say Wow. I don’t think I need to go further with where this came from) There will probably be 3 or 4 of these in a track so you need at least 3 or 4 money shots! You also need enough good footage to fill the rest of the track.
Play the music several times and identify where you will cut and change to a different shot. Some video editors can analyse the track and place markers on the beats making it easy for you to cut on the beat. I use Final Cut Pro X and that allows me to tap the keyboard to place markers on the audio track where I want to change shots. Cutting to the beat properly can lift a video from being good to amazing. Don’t think you have to cut on every change in beat though otherwise it can become too predictable.
Storyboard your film
Based on your research your now in a position to mentally imagine how your film will look set to that music track. If you can’t imagine this then your not going to have much luck in the field getting the shots you want.
Draw very simple stick figure type pictures of each scene to help with the creation of a shot list for you to follow. It sounds a lot of work but its not, and its going to make your life so easy when filming and editing later. No drawing skills are necessary as nobody but you will see it. Either use this or make a simple list of shots you intend to shoot. This will be your guide on the day.
I use post-it notes like this. The little symbol represents my camera and what angle it will point. By the way there is no spell checker on a post-it note
The night before
Charge everything and confirm its working
Clear memory cards.
Take spare Tx batteries.
Take your Phone usb cable for charging in the car
Take your DJI Mini Usb cable for charging the range extender in the car
Possibly take an inverter and DJI charger for field charging your main batteries from 12v socket
Charge ground camcorders and audio recorders
Don’t forget your shot list.
If your flying a Phantom Vision then strap your Gopro to your head to record in flight footage of the Phantom automatically.
On Location
Get there in plenty of time.
Set up your Phantom and go through your checks
Get out your shot list and work through it ticking them off.
Get the ‘money shots’ asap.
Don’t waste battery power - plan the flight - place the Phantom in the sky - film - land.
Allow cutting room on shots, a little extra footage can be a life saver.
If your confident enough use ATTI mode for smoothness during flight.
Film slowly as it can always be speeded up during editing.
Don’t get sidetracked by passersby, your there to shoot the shot list not chat.
Film plenty of ground action cutaways
Film plenty of ground shots of the phantom in flight to act as links between aerial shots.
Record ambient sound of the site. Try to get one or more continuous takes a bit longer than the total length of your final video. This avoids having to loop the audio.
Finally by all means grab any spontaneous shots that appear on the day in addition to the shot list.
Editing your masterpiece
I find editing the video to be the most enjoyable part of the whole process. The most important point I can make is to take your time. There is no need to rush this. Often you will experience a desperate desire to post your video asap. DONT. Resist this newbie type error otherwise you will regret it.
Start by assembling your shots as per your story board but don’t be afraid to change the order if it looks better.
Add any titles and end credits at this point. This way you are able to take them into consideration when cutting to the music. Finalise the order of the clips before you focus on the sound. Then start to cut the shots to the music.
Review the film several times and make improvements. As you watch it there will be bits that your gut feeling tell you are not right. Don’t ignore them, get them fixed. Be ruthless with your material. Exclude anything that does not add to the story your telling. Provided you have shot plenty of clips you should be spoilt for choice not scraping the barrel.
Once you are 100% satisfied don’t post it. Leave it until the next day and review it again. Editing can be tiring and so taking some time away from your project brings fresh eyes and allows you to polish it. Finally you will look at it and say ‘I can do no more’. This is the time to upload it and craft a little piece explaining what the film is about and how you went about its production. By all means include a list of the equipment used, the editor etc as people will want to know.
There is nothing more satisfying
The Power Of Reverse
This video tip demonstrates how Quads experience turbulence when descending. Things are much smoother in the climb. A poster on this forum (apologies but I can't find who) mentioned that professional pilots often film a shot in the climb for smoothness and just reverse the clip if they need a descent. You can also fake a really smooth landing by filming the takeoff and reversing it.
[youtube]http://www.youtube.com/watch?v=1geozI4ZNhA[/youtube]
Good Examples From This Forum
'Touch The Sky ' by forum member Nrameckers - fantastic use of shadows, sunlight, different angles and the emotion of music.
[youtube]http://www.youtube.com/watch?v=2NCI2f4rOa0[/youtube]