

FIRST THINGS FIRST
Parts List:
Rooted Android Samsung Galaxy Tab Pro 8.4 -------------- http://forum.xda-developers.com/showthread.php?t=2661198
PS3 Dual Shock controller ----------------------------------- http://www.engadget.com/2007/05/01/how-to-make-a-ps360-controller/
Sixaxis Controller app from the PlayStore ----------------- https://play.google.com/store/apps/details?id=com.dancingpixelstudios.sixaxiscontroller
Six momentary micro push button switches --------------- http://www.radioshack.com/product/index.jsp?productId=2062546
Two 4.7k/ohm resistors ----------------------------------------http://www.radioshack.com/product/index.jsp?productId=2994581
Hot glue ----------------------------------------------------------- http://www.walmart.com/msharbor/ip/Ad-tech-Hi-Temp-Mini-Size-Glue-Gun/17404361
Solder and lead wire --------------------------------------------- http://www.radioshack.com/product/index.jsp?productId=21982276
UPDATE:
Video is up and running
[youtube]http://www.youtube.com/watch?v=V2sRmXg9z3E[/youtube]
UPDATE:
Status light mod shows connectivity of PS3 board to tablet... charging... etc...
[youtube]http://www.youtube.com/watch?v=YUAT8t8lKV8[/youtube]
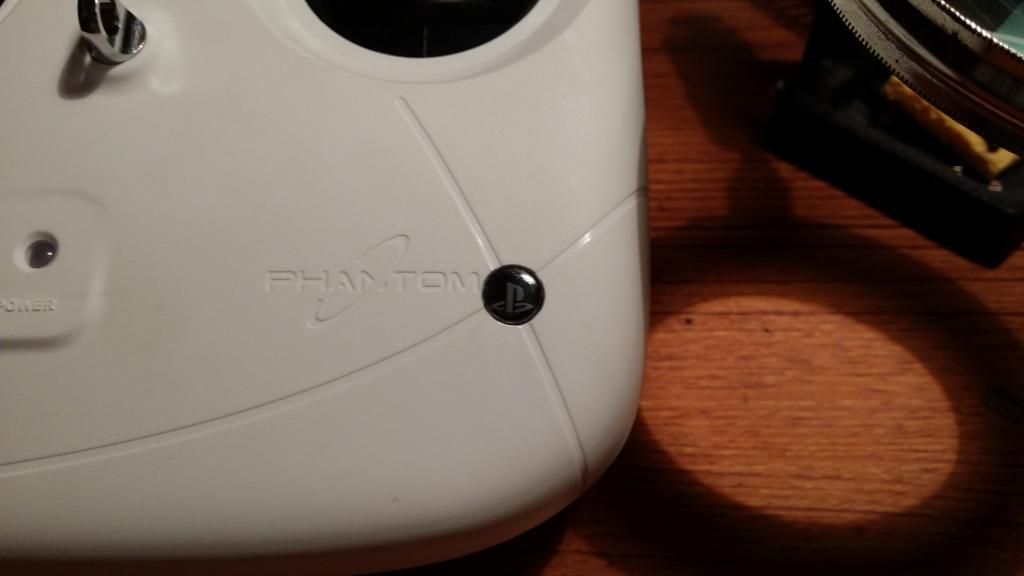
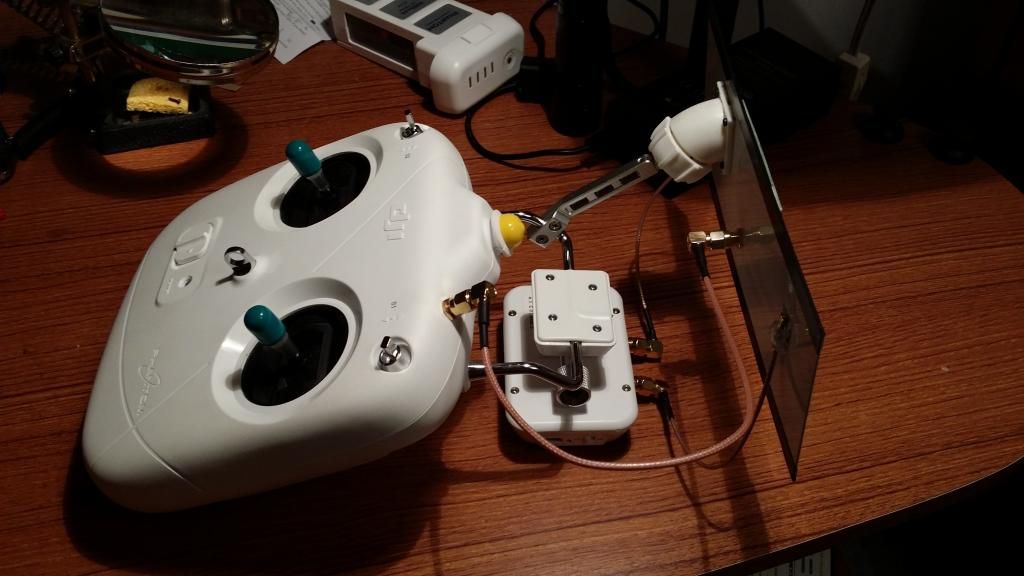
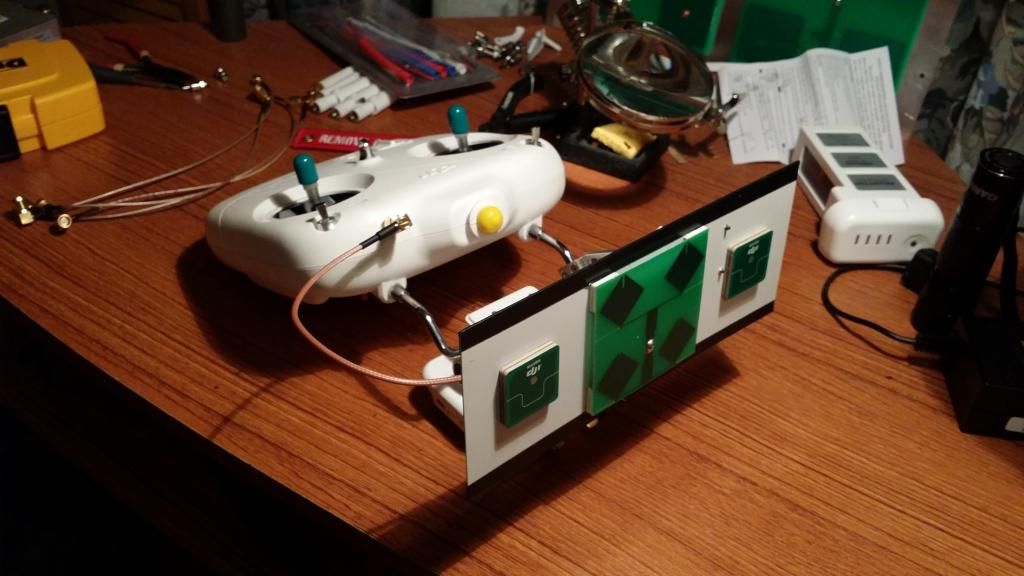
X marks the spot!!!
UPDATE:
ADDED SCREENSHOT FUNCTION AND DETAILS HERE... http://www.phantompilots.com/viewtopic.php?f=27&t=25939&start=70#p245273
OK ... So the point of all this...
Controlling on screen functions without taking your hands off the controls to touch the screen... that's the name of the game here...
You could easily just use the PS3 controller and figure a way to attach it to the back of your DJI transmitter where the buttons would be accessible...
Basically what i was shooting for was something small enough to fit inside the Phantom tx so it is hidden away from view... :ugeek:
And so it began 3 days ago
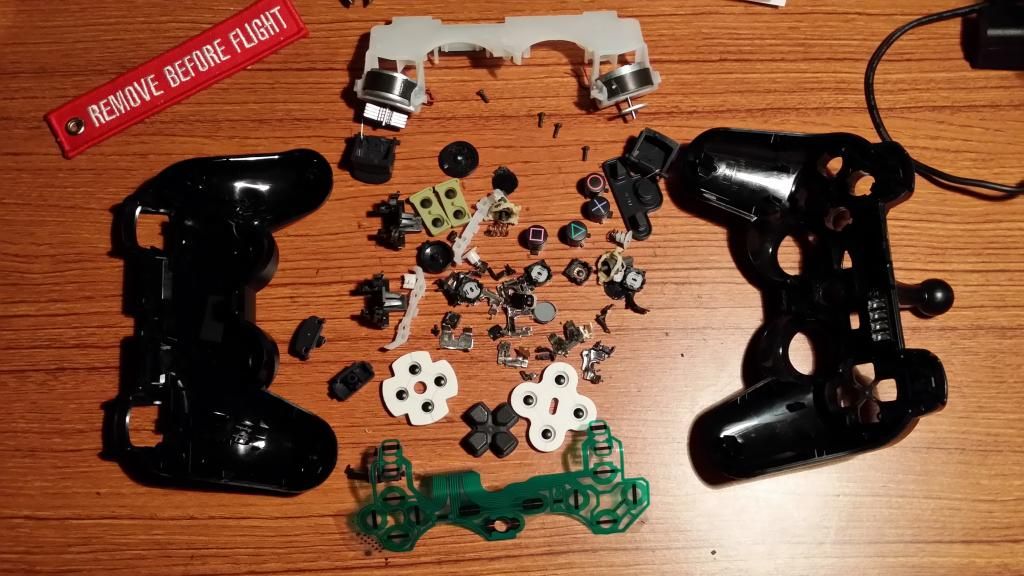
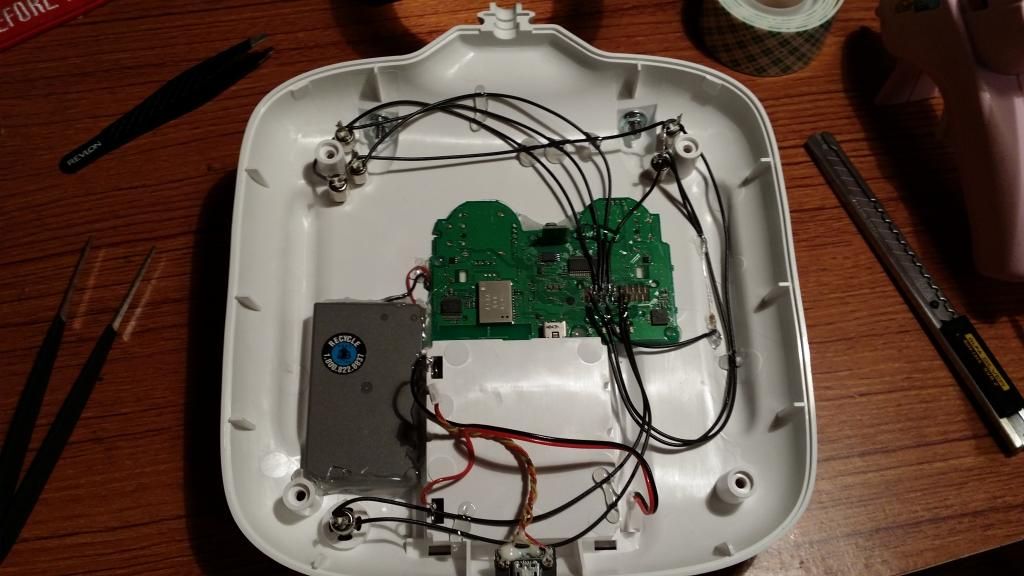
Started off with your basic PS3 controller... When you open it up you're presented with a mess of crap you don't need for this mod.
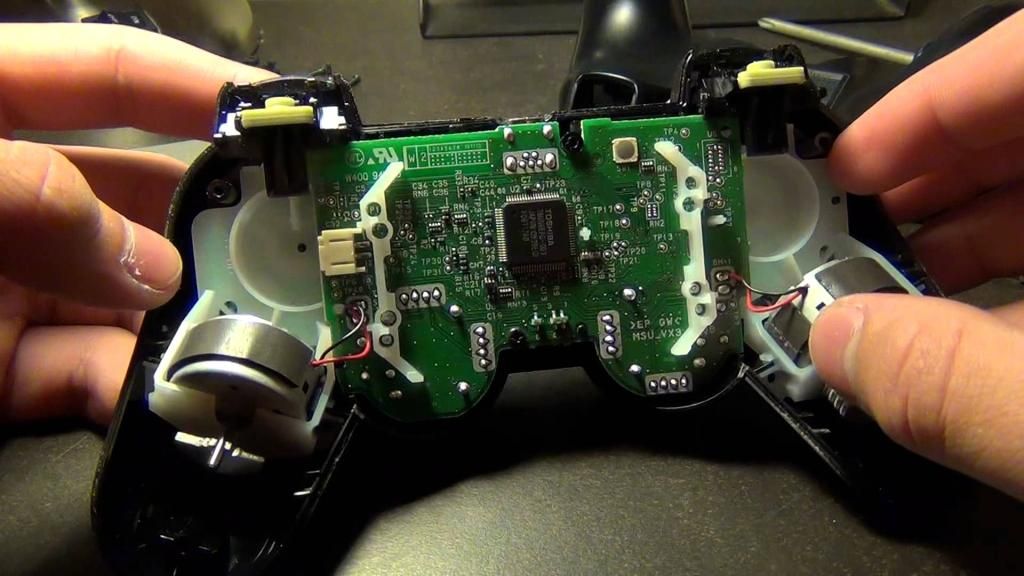
So if you break it down in layers, you only really need the controller PCB (mother board)... but even that has the analog stick boxes mounted to it... Those gotta go too.

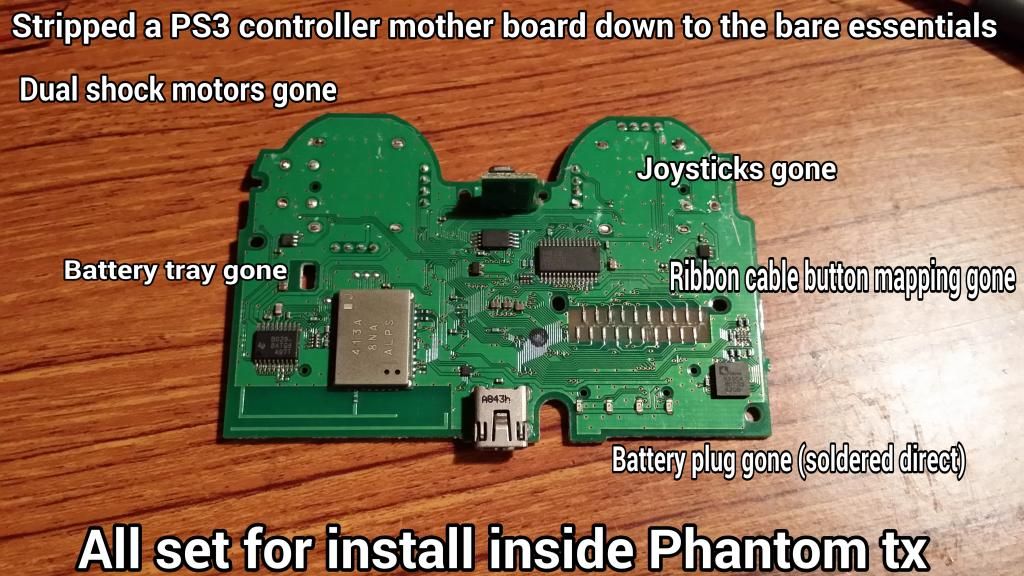
I ripped everything apart... Tore off everything i could while maintaining the functionality of the controller... Ended up with this nice little compact board.
And this big 'ol pile of crap on my desk when i was done.... :mrgreen:
Moving on... got it basically laid out where i think it will fit and snap the controller back together to check that it clears the back of the control sticks etc....
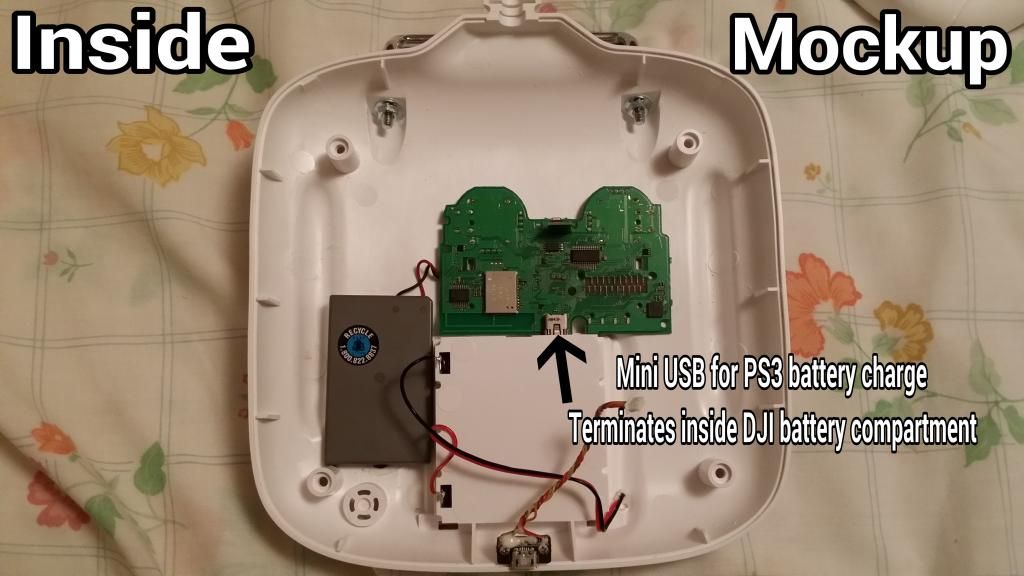
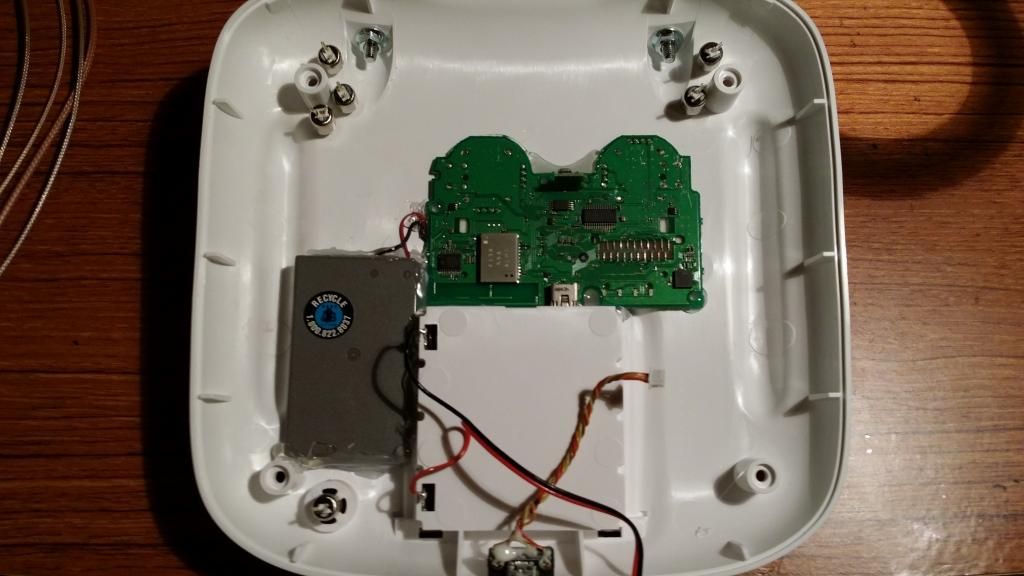
This spot works nice for the USB port to charge the DualShock battery
Next thing was button layout... spent some time just holding the remote and figuring where is easy to access but out of the way... where my index fingers normally rest and some spots close to that position for ergonomic function...
Then... which onscreen functions i want access to and how to lay that out...
Ended up with this... Note the PS3 charger port in the battery compartment and the power button recessed inside the speaker hole :ugeek:
Flipped everything back over and used 3M double sided sticky tape to hold down the mother board... hot glue for the battery and some extra around the mother board for good measure...
Wired up and fired up!!!
Everything all wired and hot glued for strength and longevity... Tested and all buttons firing as they should be... Bluetooth pairing with tablet working like a boss... All i need now is a length of fiber optic filament to bring the PS3 controller LED light to the front panel for power and pairing confirmation... :ugeek:
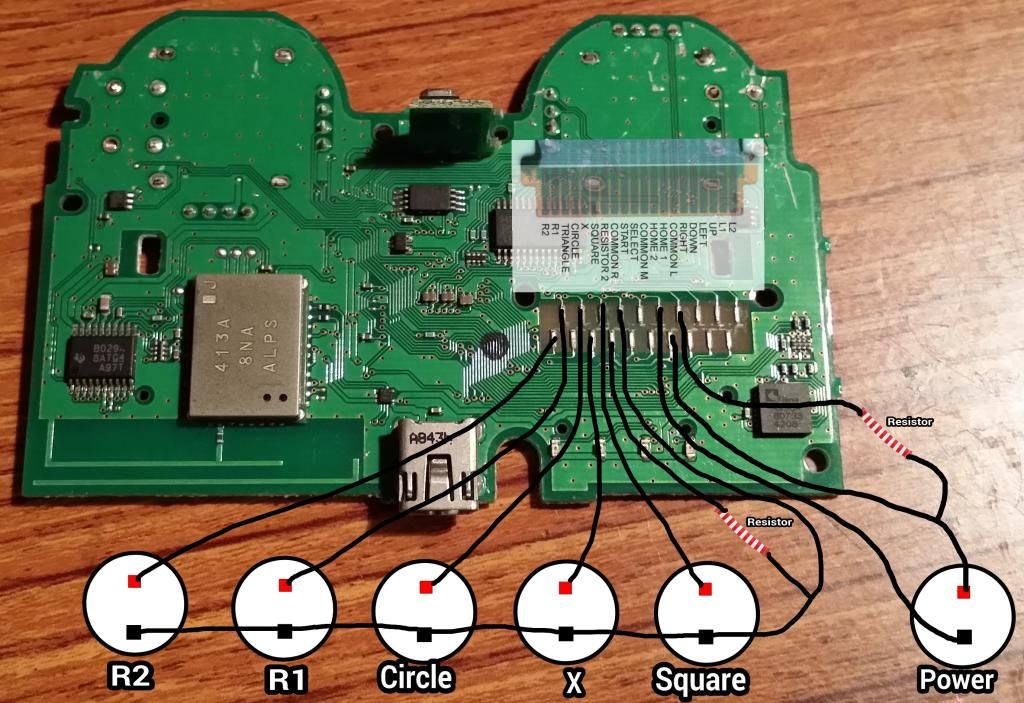
And a decent idea of how it is all wired to the switches and resistors... resistors must be included or ALL the buttons are firing ALL the time
Next step was mapping out the appropriate buttons to their corresponding screen locations in the DJI Vision app...
I used:
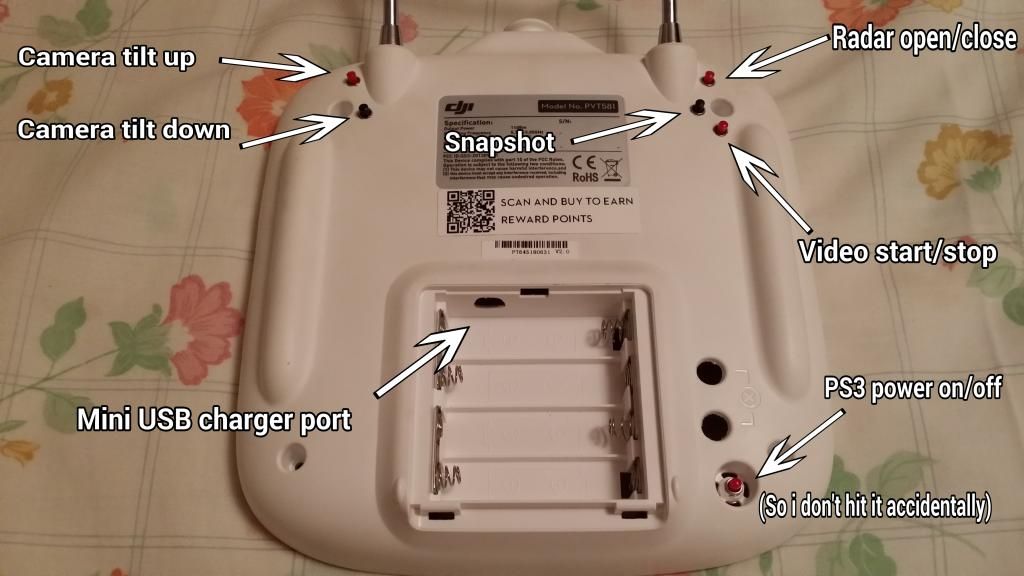
R1: Camera tilt up
R2: Camera tilt down
Cross: Radar open/close
Square: Snapshot
Circle: Video start/stop
Easily done with the Sixaxis app...
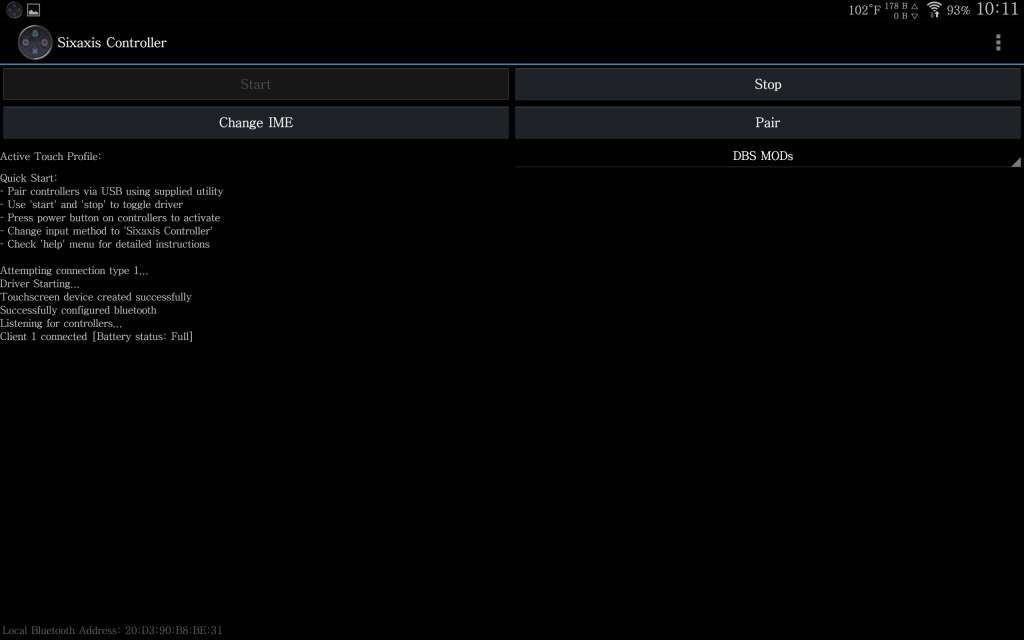
So the one thing my buddy brought up was "why put the USB port inside the battery compartment? ... That means you have to take out the batteries every time you charge the PS3 controller?" ... GOOD POINT ... BUT ... Battery run time on a PS3 controller is rated at 30 hours... and the Sixaxis app has a nifty little feature ... every time you open the app to pair the controller... it gives you battery level ... (Not to mention, making the hole for the USB port the right shape, the right size, AND look good? ... wasn't gonna happen... so now it's hidden) ...
So yeah ... you don't need to charge very often and the app tells you when you need to do it... :ugeek:
Shown here... last line in the connection dialogue on the left
So there it is... all buttoned up... tested and confirmed and ready to fly tomorrow... can't wait!!! :ugeek:
Links and stuff:
How to make a PS360 controller: http://www.engadget.com/2007/05/01/how-to-make-a-ps360-controller/
Gave me the knowledge and confidence to take that controller apart and rip it to shreds... great button wiring diagram... (and the mandatory 4.7k resistor that nobody else talked about)
Sixaxis Controller app tutorial and info: http://www.youtube.com/watch?v=slz2kJnH0fs
http://www.phonearena.com/news/How-...ith-your-Android-smartphone-or-tablet_id31933
For rooted android devices... (your mileage may vary)
Soldering 101: http://www.youtube.com/results?search_query=soldering+for+dummies
Always helps to brush up on the skills before doing this microscopic solders (took me a magnifying glass and number 3 reading glasses to do the board)
Aaaaannnddddddd that's about it... Thanks for letting me share
I know.... I went a little nuts with the whole deal :ugeek:

and thanks again to kickthefences for inspiring this whole mess :ugeek:
Parts List:
Rooted Android Samsung Galaxy Tab Pro 8.4 -------------- http://forum.xda-developers.com/showthread.php?t=2661198
PS3 Dual Shock controller ----------------------------------- http://www.engadget.com/2007/05/01/how-to-make-a-ps360-controller/
Sixaxis Controller app from the PlayStore ----------------- https://play.google.com/store/apps/details?id=com.dancingpixelstudios.sixaxiscontroller
Six momentary micro push button switches --------------- http://www.radioshack.com/product/index.jsp?productId=2062546
Two 4.7k/ohm resistors ----------------------------------------http://www.radioshack.com/product/index.jsp?productId=2994581
Hot glue ----------------------------------------------------------- http://www.walmart.com/msharbor/ip/Ad-tech-Hi-Temp-Mini-Size-Glue-Gun/17404361
Solder and lead wire --------------------------------------------- http://www.radioshack.com/product/index.jsp?productId=21982276
UPDATE:
Video is up and running
[youtube]http://www.youtube.com/watch?v=V2sRmXg9z3E[/youtube]
UPDATE:
Status light mod shows connectivity of PS3 board to tablet... charging... etc...
[youtube]http://www.youtube.com/watch?v=YUAT8t8lKV8[/youtube]
X marks the spot!!!
UPDATE:
ADDED SCREENSHOT FUNCTION AND DETAILS HERE... http://www.phantompilots.com/viewtopic.php?f=27&t=25939&start=70#p245273
OK ... So the point of all this...
Controlling on screen functions without taking your hands off the controls to touch the screen... that's the name of the game here...
You could easily just use the PS3 controller and figure a way to attach it to the back of your DJI transmitter where the buttons would be accessible...
Basically what i was shooting for was something small enough to fit inside the Phantom tx so it is hidden away from view... :ugeek:
And so it began 3 days ago
Started off with your basic PS3 controller... When you open it up you're presented with a mess of crap you don't need for this mod.
So if you break it down in layers, you only really need the controller PCB (mother board)... but even that has the analog stick boxes mounted to it... Those gotta go too.
I ripped everything apart... Tore off everything i could while maintaining the functionality of the controller... Ended up with this nice little compact board.
And this big 'ol pile of crap on my desk when i was done.... :mrgreen:
Moving on... got it basically laid out where i think it will fit and snap the controller back together to check that it clears the back of the control sticks etc....
This spot works nice for the USB port to charge the DualShock battery
Next thing was button layout... spent some time just holding the remote and figuring where is easy to access but out of the way... where my index fingers normally rest and some spots close to that position for ergonomic function...
Then... which onscreen functions i want access to and how to lay that out...
Ended up with this... Note the PS3 charger port in the battery compartment and the power button recessed inside the speaker hole :ugeek:
Flipped everything back over and used 3M double sided sticky tape to hold down the mother board... hot glue for the battery and some extra around the mother board for good measure...
Wired up and fired up!!!
Everything all wired and hot glued for strength and longevity... Tested and all buttons firing as they should be... Bluetooth pairing with tablet working like a boss... All i need now is a length of fiber optic filament to bring the PS3 controller LED light to the front panel for power and pairing confirmation... :ugeek:
And a decent idea of how it is all wired to the switches and resistors... resistors must be included or ALL the buttons are firing ALL the time
Next step was mapping out the appropriate buttons to their corresponding screen locations in the DJI Vision app...
I used:
R1: Camera tilt up
R2: Camera tilt down
Cross: Radar open/close
Square: Snapshot
Circle: Video start/stop
Easily done with the Sixaxis app...
So the one thing my buddy brought up was "why put the USB port inside the battery compartment? ... That means you have to take out the batteries every time you charge the PS3 controller?" ... GOOD POINT ... BUT ... Battery run time on a PS3 controller is rated at 30 hours... and the Sixaxis app has a nifty little feature ... every time you open the app to pair the controller... it gives you battery level ... (Not to mention, making the hole for the USB port the right shape, the right size, AND look good? ... wasn't gonna happen... so now it's hidden) ...
So yeah ... you don't need to charge very often and the app tells you when you need to do it... :ugeek:
Shown here... last line in the connection dialogue on the left
So there it is... all buttoned up... tested and confirmed and ready to fly tomorrow... can't wait!!! :ugeek:
Links and stuff:
How to make a PS360 controller: http://www.engadget.com/2007/05/01/how-to-make-a-ps360-controller/
Gave me the knowledge and confidence to take that controller apart and rip it to shreds... great button wiring diagram... (and the mandatory 4.7k resistor that nobody else talked about)
Sixaxis Controller app tutorial and info: http://www.youtube.com/watch?v=slz2kJnH0fs
http://www.phonearena.com/news/How-...ith-your-Android-smartphone-or-tablet_id31933
For rooted android devices... (your mileage may vary)
Soldering 101: http://www.youtube.com/results?search_query=soldering+for+dummies
Always helps to brush up on the skills before doing this microscopic solders (took me a magnifying glass and number 3 reading glasses to do the board)
Aaaaannnddddddd that's about it... Thanks for letting me share
I know.... I went a little nuts with the whole deal :ugeek:
and thanks again to kickthefences for inspiring this whole mess :ugeek:


